
A proper Uneekor golf simulator setup starts well before you unbox the launch monitor. Getting the room dimensions right, building or buying a PC that meets the specs, and understanding the installation process will save you from costly mistakes and frustrating rework. This guide covers everything you need to plan and execute a clean, working simulator build around any Uneekor launch monitor.
Room Size Requirements for a Uneekor Simulator
The room you choose will dictate which Uneekor model works for your space, so start here before buying anything. Overhead models like the EYE XR, EYE XO, and EYE XO2 need a minimum ceiling height of 9 feet, with 9.5 feet or taller strongly recommended. That extra half foot gives the overhead cameras a wider field of view and a better angle on the hitting zone, which translates to more reliable data capture. Width should be at least 10 feet, and you want 16 feet of depth to give yourself room for the screen, a comfortable standing position, and projector throw distance behind you.
Floor-mounted models, the EYE MINI and EYE MINI LITE, require a bit more width at 12 feet minimum. Depth can be shorter at 12 feet minimum since the unit sits behind the hitting area rather than overhead. Ceiling height still needs to be at least 9 feet so you can swing freely without worrying about making contact with the ceiling on your backswing, especially with longer clubs like the driver.
| Dimension | Overhead (XR, XO, XO2) | Floor (MINI, MINI LITE) | Recommended |
|---|---|---|---|
| Ceiling Height | 9 ft min | 9 ft min | 9.5 ft+ |
| Room Width | 10 ft min | 12 ft min | 12 ft+ |
| Room Depth | 16 ft recommended (10 ft min) | 12 ft min | 16 ft+ |
| Mounting | Ceiling (bracket included) | Floor (beside ball) | - |
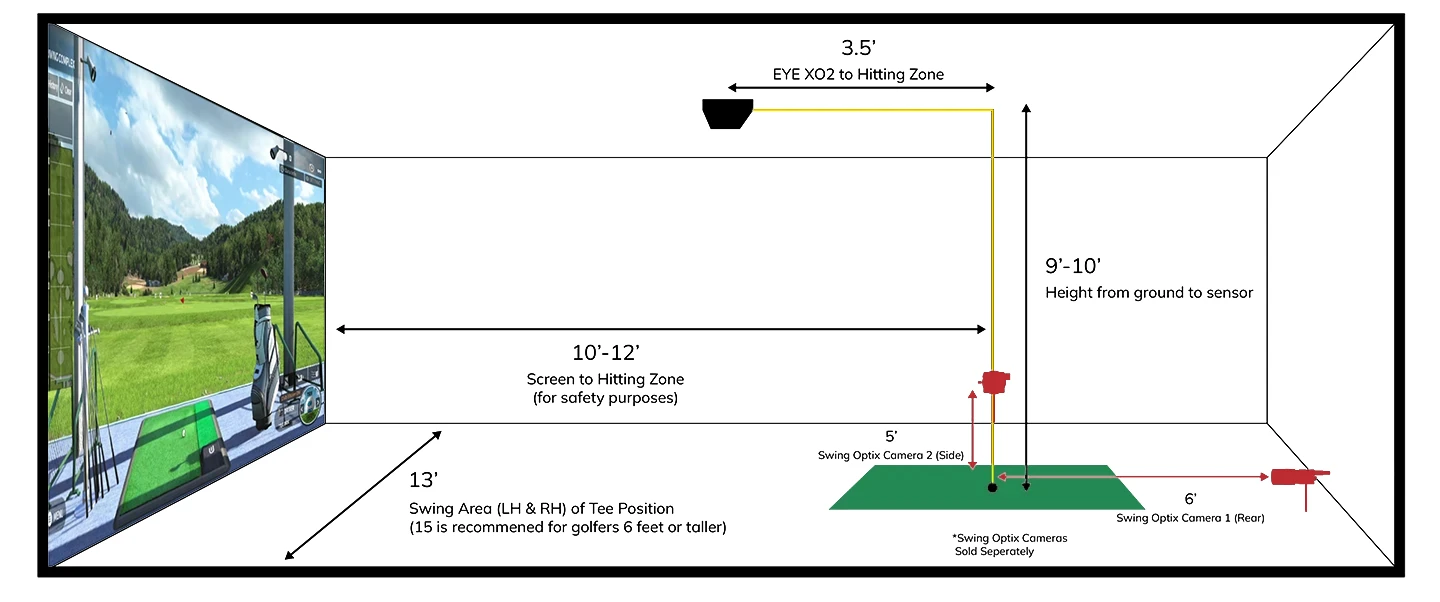
Room layout for the Uneekor EYE XO / XO2 — overhead sensor mounted 9–10 ft high, 3.5 ft in front of the hitting zone.
Depth is the dimension most people underestimate. You need enough space between you and the impact screen so the ball has time to register on the launch monitor before hitting the screen. You also need room behind you for the projector to throw a full image onto the screen. Short throw projectors help in tighter rooms, but even then, plan for at least a couple of feet behind your standing position for the projector. Check our projector placement guide for throw distance calculations.

EYE XR placement diagram — single PoE cable, sensor positioned 3.5 ft ahead of the hitting zone at 9–10 ft height.
Garages are the most common choice because they tend to have the length, and ceiling height is usually workable if you have standard 9 or 10 foot garage doors. Basements work well too, though watch for support columns, ductwork, and low-hanging obstacles that eat into your effective ceiling height. Measure the lowest point in the room, not the highest. A dedicated room is ideal if you are building new construction, but most golfers are retrofitting existing spaces and making it work.
PC Requirements for Uneekor Launch Monitors
Every Uneekor launch monitor connects to a Windows PC, and only a Windows PC. Mac is not supported, and neither is iPad or any other tablet. At a bare minimum for running Uneekor's included View Software, you need an Intel i5 8400 or AMD Ryzen 3600 processor, 8 GB of RAM, an NVIDIA GeForce GTX 1060 graphics card, and Windows 10 64-bit version 1803 or higher. If you plan to use the optional Swing Optix cameras for club and swing video capture, bump the RAM to 16 GB.
| Component | Minimum (View Software) | Recommended (GSPro/E6) | With Swing Optix |
|---|---|---|---|
| Processor | Intel i5 8400 / Ryzen 3600 | Intel i7 / Ryzen 5600+ | Intel i7 / Ryzen 5600+ |
| RAM | 8 GB | 16 GB | 16 GB |
| GPU | NVIDIA GTX 1060 | NVIDIA GTX 1660+ | NVIDIA GTX 1660+ |
| OS | Windows 10 64-bit | Windows 10/11 64-bit | Windows 10/11 64-bit |
| Ethernet | Required (built-in port) | Required (built-in port) | Required (built-in port) |
Most Uneekor owners are not stopping at View Software. If you are running GSPro, E6 Connect, or any third-party simulation software, you need a proper gaming-grade PC. Plan on an NVIDIA GTX 1660 or better GPU, 16 GB of RAM, and a modern multi-core processor. GSPro in particular will punish an underpowered machine with stuttering, long load times, and dropped frames. If you do not want to build your own rig, we carry the SurfThing simulator PC, which is purpose-built for golf simulation and comes ready to go out of the box.
One requirement that catches people off guard is the ethernet port. Every Uneekor model requires a direct ethernet connection to the PC. WiFi does not work. USB-to-ethernet adapters do not work. Your PC needs a built-in ethernet port, and you need a Cat6 cable running between the launch monitor and the computer. This is non-negotiable and is the single most common support issue we see with new Uneekor installations.
How to Install an Overhead Uneekor Launch Monitor
Overhead installation for the EYE XR, EYE XO, and EYE XO2 is straightforward if you plan ahead. Each unit ships with a ceiling mount bracket and the hardware you need to attach it. Secure the bracket to a ceiling joist or use appropriate anchors for your ceiling type. The launch monitor then attaches to the bracket and gets positioned directly above the hitting zone. Height and angle matter here because the cameras need an unobstructed downward view of the ball and club at impact.
Cable routing is where the EYE XR has a real advantage. It uses Power over Ethernet, which means a single Cat6 cable carries both power and data from the launch monitor down to your PC. One cable, clean installation, simple routing. The EYE XO and EYE XO2 require two connections each: a USB cable to the PC for data and a separate power cable. Plan your cable path before you mount the unit so you can run cables through the ceiling or along a wall cleanly rather than having them dangle across the room.
Once the unit is physically mounted and connected, you will run the View Software calibration process to align the cameras to your hitting zone. First-time calibration takes about 15 minutes and involves placing calibration targets on the mat so the system can map the exact position of the ball relative to the cameras. After that initial setup, you should not need to recalibrate unless you physically move the unit. One nice feature across all overhead Uneekor models is that switching between left-handed and right-handed players does not require recalibration. You just toggle the setting in the software.
Setting Up a Floor-Mounted Uneekor (EYE MINI & MINI LITE)
The EYE MINI and EYE MINI LITE are significantly simpler to install since there is no ceiling work involved. Place the unit on the floor behind the hitting area, align it with the ball position using the built-in alignment guides, and connect the ethernet cable to your PC and the power cable to an outlet. The unit reads the ball and club from behind rather than above, so positioning and alignment with the hitting mat are the critical steps.
The main tradeoff with floor models is that they occupy floor space behind your hitting zone, and you need to be mindful of not bumping or shifting the unit during play. The EYE MINI has a battery option for portability, which is useful if you move the unit between locations or take it outdoors. The EYE MINI LITE requires a constant power source with no battery option, so it needs to stay near an outlet. Both models connect via ethernet and a separate power cable, so plan for two cable runs from the unit to your PC and power source.
Choosing Your Screen, Projector, and Mat
Your impact screen needs to be rated specifically for golf simulator use. A standard projector screen or bedsheet will not survive repeated ball strikes, and a ball punching through your screen is both dangerous and expensive. Dedicated golf simulator impact screens are designed to absorb the energy of a full-speed drive without tearing or bouncing the ball back at you. Screen size depends on your room width, but most setups use something in the range of 10 to 12 feet wide.
For the projector, short throw models are recommended for smaller rooms because they can produce a large image from just a few feet away. This matters when your total room depth is limited and you do not have 8 to 10 feet behind you for a standard throw projector. Brightness matters too — if your room has windows or overhead lighting, you need enough lumens to keep the image visible and vibrant. See our best golf simulator projectors guide for detailed comparisons, or our brightness guide if lumens are your main concern.
Any standard golf simulator hitting mat works with all Uneekor models. For overhead units, the mat just needs to be positioned in the hitting zone below the cameras. For floor units, the mat needs to align with the unit's sensor window. There is no proprietary mat requirement. You will also need an enclosure or frame to hold the impact screen taut and in position. We carry complete simulator packages as well as individual components if you prefer to build your own frame.
Software Setup: Getting Your First Session Running
Start with Uneekor's View Software, which is included free with every launch monitor. This is both the calibration tool and a basic virtual driving range that displays ball and club data. Install it first, run calibration, and confirm everything is reading correctly before you move to third-party software. View gives you ball speed, launch angle, spin rates, and club data so you can verify the system is dialed in.
From there, GSPro is the most popular third-party simulator software among Uneekor owners, and for good reason. It offers access to over 200,000 courses, including recreations of famous real-world tracks, and the community is active and growing. Other solid options include E6 Connect for its polished graphics and multiplayer features, TGC 2019 for its massive course library of over 170,000 courses, Creative Golf 3D, and ProTee Play. Uneekor also offers their own Refine and Refine+ platforms for premium swing analysis. Each software option has its own system requirements, so check those against your PC specs before purchasing.
Common Setup Mistakes to Avoid
These are the issues we see most often from new Uneekor simulator owners:
- Ceiling too low — Under 9 feet and you risk hitting the ceiling with your club or not having enough clearance for the overhead cameras to work properly. Measure before you buy.
- Using WiFi or a USB ethernet adapter — The system will not work. You need a Cat6 cable plugged directly into your PC's built-in ethernet port.
- Trying to run on a Mac or iPad — Uneekor requires Windows 10 64-bit. There is no workaround.
- Underpowered PC for third-party software — View Software runs on modest hardware, but GSPro and E6 Connect need a real gaming PC. A GTX 1060 will struggle with modern simulation software.
- Not leaving enough depth for projector throw — Even short throw projectors need some distance. Measure your projector's throw ratio against your screen size before you commit to screen placement.
- Skipping calibration — The 15-minute calibration process exists for a reason. Inaccurate calibration leads to inaccurate data, and you will chase phantom swing problems that do not actually exist.
Which Uneekor Launch Monitor Fits Your Setup?
Every Uneekor model tracks 19 data points and works with the same software platforms. The difference comes down to mounting style, price, and convenience features. Here is the full lineup from entry to flagship:

EYE MINI LITE
Entry-level Uneekor with Club Optix sticker-free tracking. Requires constant power.
View MINI LITE →
EYE MINI
Floor-mounted with battery for portability. Built-in touchscreen display.
View MINI →
EYE XR
Newest overhead model. Sticker-free tracking, PoE single-cable install, Dimple Optix.
View EYE XR →
EYE XO
Industry-proven overhead unit with thousands of installations. Requires club stickers.
View EYE XO →
EYE XO2
Flagship with the largest hitting zone. Built for commercial studios and teaching pros.
View EYE XO2 →For a detailed breakdown of how each model compares on specs, tracking technology, and included software, see our Uneekor Launch Monitors Compared guide.
Bottom Line
A Uneekor simulator setup is a straightforward project if you plan your room dimensions, build or buy the right PC, and follow the installation steps without cutting corners. Get the room right first, get the PC right second, and the rest falls into place. If you need help choosing components or have questions about your specific space, reach out to our team. We have built and supported hundreds of these setups.
Related Guides
- Uneekor Launch Monitors Compared: EYE MINI LITE vs MINI vs XR vs XO vs XO2
- Uneekor EYE XR Review: Sticker-Free Overhead Tracking for $5,499
- Best Overhead Launch Monitors for Golf Simulators (2026)
- Best Golf Simulator Projectors in 2026: All 25 Models Compared
- Golf Simulator Projector Setup Guide: Distance, Mounting & Image Size
- Browse All Uneekor Launch Monitors


