


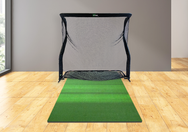


A $5,000 projector will look terrible if it's poorly placed. Correct projector setup is the single biggest factor in golf simulator image quality -- more important than resolution, more important than lumens, and often the difference between a simulator that impresses everyone who sees it and one that frustrates you every time you play.
This guide covers everything you need to know about setting up a golf simulator projector: throw distance calculations, mounting options, image alignment, ambient light control, electrical planning, and the most common mistakes we see customers make. Whether you're using a BenQ or Optoma projector, these principles apply.
Step 1: Understand Throw Distance and Throw Ratio
Throw distance is the distance between the projector lens and the impact screen. Throw ratio is the specification that determines how large the image will be at a given distance. It's the most important number in projector placement.
The Throw Distance Formula
The calculation is simple:
Throw Distance = Throw Ratio x Screen Width
For example: If your projector has a throw ratio of 0.69:1 and your screen is 10 feet wide:
0.69 x 10 ft = 6.9 feet from lens to screen
Projectors with zoom lenses have a throw ratio range (e.g., 0.69-0.83:1), giving you flexibility in placement. At 0.83:1 with the same 10-foot screen, the distance would be 8.3 feet.
Throw Distance Reference Table
Here are calculated distances for every projector we carry at common screen widths:
| Projector | Throw Ratio | 8 ft Screen | 10 ft Screen | 12 ft Screen | 14 ft Screen |
|---|---|---|---|---|---|
| Optoma GT2000HDR | 0.496:1 | 4.0 ft | 5.0 ft | 6.0 ft | 6.9 ft |
| BenQ AH500ST | ~0.5:1 | 4.0 ft | 5.0 ft | 6.0 ft | 7.0 ft |
| BenQ LK830ST | 0.5:1 | 4.0 ft | 5.0 ft | 6.0 ft | 7.0 ft |
| BenQ LU960ST2 | 0.5:1 | 4.0 ft | 5.0 ft | 6.0 ft | 7.0 ft |
| Optoma ZW350ST | 0.521:1 | 4.2 ft | 5.2 ft | 6.3 ft | 7.3 ft |
| Optoma 4K400STx | 0.5:1 | 4.0 ft | 5.0 ft | 6.0 ft | 7.0 ft |
| BenQ TH671ST | 0.69-0.83:1 | 5.5-6.6 ft | 6.9-8.3 ft | 8.3-10.0 ft | 9.7-11.6 ft |
| BenQ AH30ST | 0.69-0.83:1 | 5.5-6.6 ft | 6.9-8.3 ft | 8.3-10.0 ft | 9.7-11.6 ft |
| BenQ AH700ST | 0.69-0.83:1 | 5.5-6.6 ft | 6.9-8.3 ft | 8.3-10.0 ft | 9.7-11.6 ft |
| BenQ TK710STi | 0.69-0.83:1 | 5.5-6.6 ft | 6.9-8.3 ft | 8.3-10.0 ft | 9.7-11.6 ft |
| BenQ AK700ST | 0.69-0.83:1 | 5.5-6.6 ft | 6.9-8.3 ft | 8.3-10.0 ft | 9.7-11.6 ft |
| BenQ AW30ST | 0.72-0.87:1 | 5.8-7.0 ft | 7.2-8.7 ft | 8.6-10.4 ft | 10.1-12.2 ft |
| BenQ LK936ST | 0.81-0.89:1 | 6.5-7.1 ft | 8.1-8.9 ft | 9.7-10.7 ft | 11.3-12.5 ft |
| BenQ LU710 | 1.13-1.46:1 | 9.0-11.7 ft | 11.3-14.6 ft | 13.6-17.5 ft | 15.8-20.4 ft |
Distances are measured from the projector lens to the screen surface. Always verify with your specific projector's manual or the manufacturer's projection calculator before finalizing placement.
Step 2: Choose Your Mounting Method
There are three primary ways to mount a golf simulator projector. Each has advantages depending on your room layout, ceiling height, and projector model.
Ceiling Mount (Most Popular)
Ceiling mounting is the most common approach for golf simulators and offers several advantages:
- Keeps the projector completely out of the swing path -- no risk of hitting it with a club or ball
- Centered, overhead position minimizes or eliminates the need for keystone correction
- Clean cable routing through the ceiling or along walls
- Works with most projectors -- nearly all BenQ and Optoma units support inverted ceiling mounting
Best for: Ceilings 9 feet or higher. At 8 feet, it can still work but gets tight -- make sure the projector clears your head and the top of your backswing.
What you need: A universal projector ceiling mount (check the projector's weight rating), HDMI cable run to the ceiling, and a power outlet nearby (or a cable run to one).
Shelf/Table Mount (Behind the Golfer)
Placing the projector on a shelf or table behind the hitting area works well for short-throw and ultra-short-throw projectors:
- Easy to set up and adjust -- no drilling into the ceiling
- Good for renters or temporary setups
- Simple cable management -- everything is at floor/shelf level
Considerations: The projector needs to be positioned at the correct height (typically centered on the screen vertically, or using lens shift to compensate). Keep it stable -- vibrations from a golf hit nearby can shift alignment over time.
Floor Mount (Projecting Upward)
Ultra-short-throw projectors like the BenQ LK830ST or BenQ LU960ST2 can sit on the floor close to the screen and project upward:
- Perfect for low ceilings (under 8 feet) where ceiling mounting is impractical
- Minimal shadow issues -- the projector sits below the golfer's feet
- Requires an enclosure or guard to protect from errant balls and foot traffic
Best for: Rooms with low ceilings, tight spaces, or when ceiling mounting isn't an option. Ultra-short-throw projectors (0.5:1 ratio or less) are ideal for this configuration.
Step 3: Aspect Ratio and Screen Matching
Your screen's aspect ratio and your projector's native aspect ratio should match for the best image quality. Mismatched ratios mean either black bars (unused screen space) or stretched/cropped images.
Common Aspect Ratios for Golf Simulators
| Aspect Ratio | Shape | Best For | Projectors That Match |
|---|---|---|---|
| 16:9 | Wide rectangle | Movies, gaming + golf | Most BenQ and Optoma models |
| 16:10 | Slightly taller rectangle | Golf simulation (extra vertical space) | BenQ AW30ST, LU710, LU960ST2; Optoma ZW350ST |
| 4:3 | Nearly square | Dedicated golf simulation | Supported via Screen Fill on most BenQ golf projectors |
Important: Many golf simulator screens are designed for a 4:3 or near-square aspect ratio to maximize vertical height for a realistic view of your shot arc. BenQ's "Screen Fill" feature on their golf series projectors (AH30ST, AH500ST, AH700ST, AK700ST, etc.) automatically adjusts to fill 1:1, 4:3, 16:9, or 16:10 screens -- a major convenience feature for golf simulator builders.
Step 4: Physical Alignment -- Get This Right First
Physical alignment is the foundation of a great image. Always get the physical position right before touching any digital correction settings.
The Alignment Process
- Temporarily position the projector at the calculated throw distance. Don't mount it permanently yet.
- Turn it on and project a test pattern (most projectors have a built-in grid pattern in the menu).
- Center the projector horizontally so the image is centered on the screen left-to-right.
- Adjust height so the image fills the screen vertically. For ceiling mounts, most projectors have an offset that projects the image downward from the lens. Check your projector's offset specification.
- Square the projector to the screen. The lens should face the screen dead-on, not angled. Even a few degrees of angle introduces keystone distortion.
- Focus the image. Adjust the focus ring until text and grid lines are sharp across the entire screen -- especially in the corners.
Using Lens Shift vs. Keystone Correction
If the image isn't perfectly aligned after physical positioning, you have two correction tools. They are not equal:
- Lens Shift (preferred): Physically moves the lens inside the projector to shift the image up, down, left, or right without any loss of image quality. This is an optical adjustment. Use this first if your projector has it.
- Keystone Correction (use sparingly): Digitally warps the image to correct for angled projection. This reduces effective resolution and can soften the image, especially at the edges. Use only for small corrections (a few degrees maximum).
Rule of thumb: If you need more than 5-10 degrees of keystone correction, reposition the projector physically instead.
Step 5: Ambient Light Control
Even a 5,000-lumen projector will look washed out if sunlight is flooding the room. Ambient light control is one of the most overlooked aspects of projector setup.
Light Control Strategies
- Blackout curtains on any windows in the projector room -- even small basement windows make a difference
- Dimmable overhead lighting -- you don't need total darkness, but being able to reduce ambient light improves contrast dramatically
- Dark-colored walls and ceiling near the screen reduce light reflection that washes out the image
- Avoid placing lights between the projector and screen -- this creates glare directly on the projected image
Brightness guidelines by room type:
| Room Environment | Minimum Lumens | Recommended Lumens |
|---|---|---|
| Dedicated dark room (no windows) | 2,500 | 3,000+ |
| Basement with small windows | 3,000 | 3,500-4,000 |
| Garage (ambient light) | 3,500 | 4,000+ |
| Open room / overhead lighting on | 4,000 | 4,000-5,000+ |
| Commercial space / bright environment | 4,500 | 5,000+ |
Step 6: Electrical and Cable Planning
Plan your electrical and cable runs before finalizing the projector position:
- Power outlet: You need a grounded outlet within reach of the projector. For ceiling mounts, consider having an electrician install an outlet in the ceiling or run power through the attic.
- HDMI cable: Run HDMI from your PC to the projector. For runs over 25 feet, use an active HDMI cable or an HDMI-over-fiber solution to prevent signal degradation. Standard passive HDMI cables are reliable up to about 15-20 feet.
- For 4K projectors: Use HDMI 2.0 or higher cables rated for 18 Gbps (4K@60Hz). Cheap or old HDMI cables may not support 4K resolution at full refresh rate.
- Surge protection: Projectors contain sensitive electronics. Use a quality surge protector, especially in garages or basements where power can be inconsistent.
Common Mistakes to Avoid
We've helped hundreds of customers set up projectors. These are the most common mistakes we see:
1. Not Measuring Before Buying
Measure your room depth (from screen to where the projector will sit) and screen width before purchasing. Then verify the projector's throw ratio works for your space using the formula above. We've seen customers buy a projector only to discover it needs to sit 12 feet back in a room that's only 10 feet deep.
2. Relying on Keystone Instead of Proper Placement
Heavy keystone correction degrades image quality. It's not a substitute for correct physical alignment. Take the extra time to position the projector properly.
3. Ignoring Ambient Light
The most common complaint we hear -- "my projector looks washed out" -- is almost always an ambient light problem, not a projector problem. Even covering a single window can make a dramatic difference.
4. Mounting Too Close with a Standard-Throw Projector
Standard-throw projectors (like the BenQ LU710 with its 1.13-1.46:1 ratio) need significant distance. You can't place them 5 feet from the screen and expect a large image. Check the throw distance table above.
5. Not Checking Focus Corner-to-Corner
After setup, walk up to the screen and inspect all four corners and the center. A correctly-aligned projector should be uniformly sharp. If corners are soft, adjust the focus ring, check physical alignment, or verify the projector is square to the screen.
6. Using the Wrong HDMI Cable for 4K
If you have a 4K projector and the image looks blurry or the projector keeps dropping to 1080p, your HDMI cable may not support the required bandwidth. Upgrade to a certified high-speed HDMI cable.
Quick Setup Checklist
- Measure screen width and room depth
- Calculate throw distance using the projector's throw ratio
- Temporarily position the projector at the calculated distance
- Power on and project a test pattern
- Center horizontally, adjust height, square to screen
- Use lens shift (if available) for fine adjustments
- Focus the image and check all four corners
- Apply minimal keystone correction only if necessary
- Control ambient light (curtains, dimmers, dark walls)
- Permanently mount the projector
- Route cables cleanly and secure connections
- Re-check alignment and focus after mounting
Related Guides
- 4K vs 1080p: Do You Really Need a 4K Projector?
- BenQ vs Optoma: Which Projector Fits Your Golf Simulator?
- Short Throw vs Ultra-Short Throw: Projector Placement Guide
- Laser vs Lamp vs LED: Which Light Source Is Best?
- BenQ Projector Buying Guide
Need Help With Your Setup?
Browse our complete golf simulator projector collection, or call us at (888) 871-6110 for personalized setup advice. We'll help you calculate throw distances, choose the right mounting solution, and ensure your projector delivers the best possible image for your space. Every projector ships free with financing available.


